
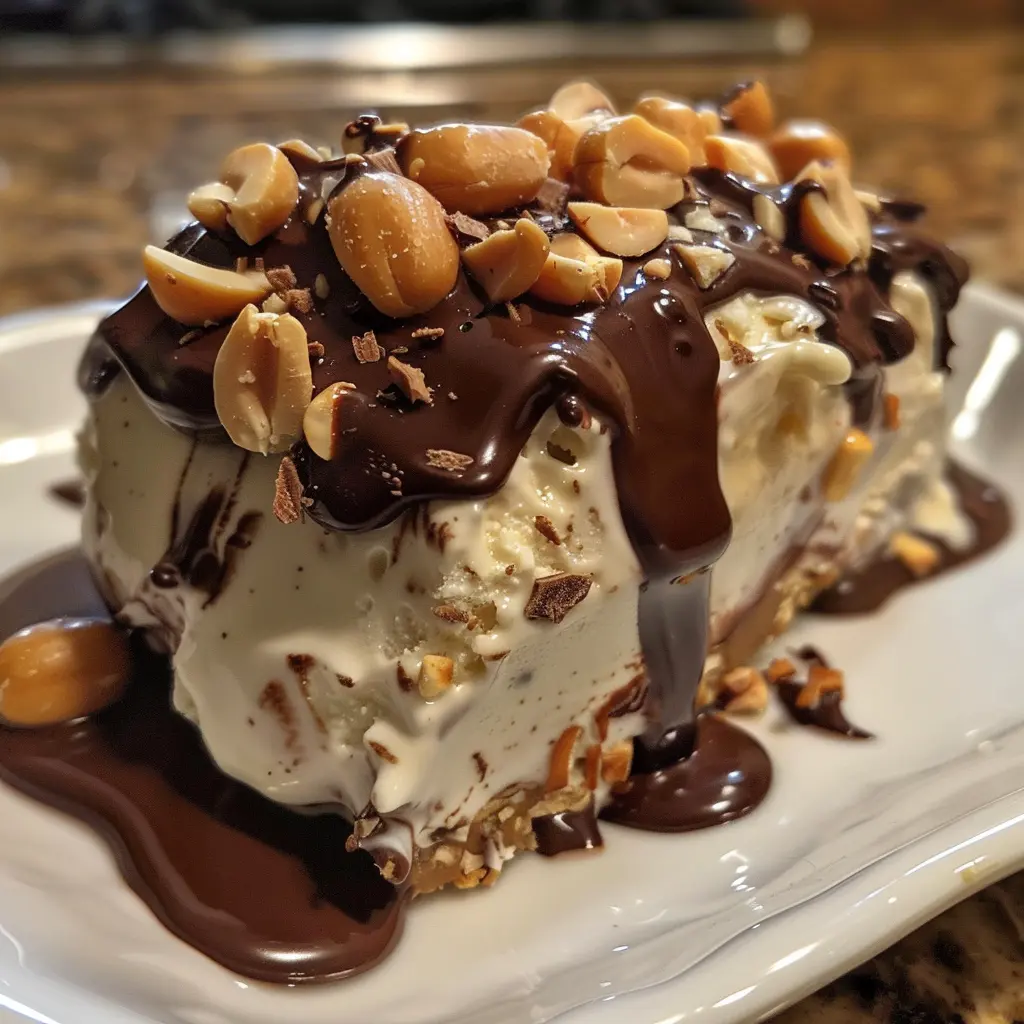
Copycat Buster Bars layer creamy vanilla bean ice cream, salted peanuts, and rich hot fudge inside a crisp Magic Shell chocolate coating to recreate the iconic Dairy Queen frozen bar at home. Made in paper cups with popsicle sticks, these are a project recipe that rewards the time you put in with a result that’s genuinely better than the original — bigger, richer, and made exactly the way you want them.
| Detail | Info |
|---|---|
| Prep Time | 15 minutes |
| Freeze Time | 4 hours minimum |
| Total Time | 4 hours 15 minutes |
| Servings | 6 bars |
| Difficulty | Medium |
| Cuisine | American / Frozen Dessert |
Why This Recipe Works
The paper cup method is the key to the entire recipe. Paper cups act as molds that give the bars their shape, protect the ice cream during the first freeze, and release the formed bars cleanly when warmed briefly in cool water. They’re inexpensive, the right size, and the slightly flexible walls make demolding easy without cracking the frozen bar. Rigid plastic molds are harder to release and require more warming, which risks melting the surface of the ice cream before the bar is free.
Using cool water — not warm, not hot — for demolding is a detail that matters significantly. Warm or hot water melts the exterior of the ice cream bar too quickly, which makes the chocolate coating slide and creates an uneven surface for dipping. Cool water provides just enough warmth differential to loosen the paper cup from the frozen bar without compromising the bar’s integrity. Ten seconds is enough — more than that and you start losing structural firmness in the outer layer.
The two-freeze method — once in the cups, then again after demolding — is what makes the chocolate shell work. The bars need to be absolutely firm before they go into the Magic Shell. Any softness in the ice cream causes the bar to flex slightly when dipped, which cracks the chocolate coating as it sets. A second freeze after demolding brings the bars to maximum firmness and ensures the Magic Shell hardens into a clean, uncracked shell.
Layering the peanuts and hot fudge throughout the bar rather than placing them only in the center creates a more interesting eating experience. Every bite through the bar encounters chocolate shell, then ice cream, then a pocket of hot fudge or a cluster of peanuts. Staggered layers mean those pockets appear at different depths in different bites, which keeps the texture and flavor more dynamic than a single central filling.
Salted peanuts are a deliberate choice over unsalted. The salt in the peanuts creates a sweet-salty contrast against the sweet ice cream and hot fudge that is one of the defining pleasures of the original Buster Bar. Unsalted peanuts are mild and fade into the ice cream; salted peanuts announce themselves and make each bite more interesting.
Ingredients
| Ingredient | Quantity | Notes |
|---|---|---|
| Salted peanuts | 2/3 cup | Pre-salted; the salt is essential to the flavor balance |
| Vanilla bean ice cream | 1.5 quarts | High-quality vanilla with visible bean specks for best flavor |
| Hot fudge sauce | 1 jar | Thick jarred fudge sauce; warm slightly before piping if needed |
| Magic Shell chocolate topping | 14.5 oz (2 bottles) | The hardening shell coating; stir or shake well before using |
| Paper cups | 6 | 9-ounce cups work well for a generous bar size |
| Popsicle sticks | 6 | Inserted after the first layer of ice cream is added |
Step-by-Step Instructions
Phase 1: Assemble the Bars
- Read through the entire recipe before starting and gather all supplies — cups, popsicle sticks, the hot fudge in a piping bag, the ice cream scoop, and the lined baking sheet — before removing the ice cream from the freezer. Speed matters once the ice cream is out; having everything ready eliminates wasted time and prevents the ice cream from softening before assembly is complete.
- Line a baking sheet with wax paper or parchment paper and set it near your work area. Line up the six paper cups on the sheet.
- Add 1 teaspoon of salted peanuts to the bottom of each cup. These will become the top of the finished bar when it’s inverted and dipped, so they’ll be the first thing you see when you bite in.
- Remove the ice cream from the freezer. Add 2 small scoops of ice cream to each cup over the peanuts. Use the back of a spoon or a small spatula to press the ice cream down firmly and create a compact, even layer. Eliminate air pockets — gaps in the ice cream create weak spots in the bar that crack when dipped.
- Spoon the hot fudge into a zip-top bag or piping bag. Cut a small corner — no more than a quarter inch — and pipe a ring of fudge around the perimeter of the ice cream layer, staying about a quarter inch from the cup wall. Piping around the perimeter rather than the center means the fudge appears as a visible ring in the finished cross-section of the bar.
- Add another teaspoon of peanuts over the fudge ring.
- Add 2 more scoops of ice cream and press down firmly to compress the layer and eliminate air pockets. Smooth the surface with the back of the spoon — this surface becomes the bottom of the bar and will be the last part dipped into the chocolate.
- Pipe another ring of hot fudge around the perimeter of this second ice cream layer.
- Sprinkle a final teaspoon of peanuts over the top of each bar.
- Insert a popsicle stick straight down into the center of each bar, pressing it through all the layers until it nearly reaches the bottom. The stick should be secure and upright — it becomes the handle for demolding and dipping.
Phase 2: First Freeze
- Place the baking sheet with all six cups into the freezer. Freeze for a minimum of 2 hours, until the bars are completely solid and there is no give when you press the top of the cup. A longer freeze — 4 hours or overnight — is better and produces a firmer bar that releases more cleanly from the cup.
Phase 3: Demold the Bars
- Fill a deep bowl with cool water. The bowl needs to be deep enough to submerge the cup to just below the rim without allowing water to enter the cup.
- Working with one cup at a time and keeping the rest in the freezer, dip the cup into the cool water for exactly 10 seconds. The water warms the paper cup just enough to release its grip on the frozen bar.
- Pull gently but firmly on the popsicle stick. The bar should slide out cleanly. If it resists, dip for another 3 to 5 seconds and try again. Do not force it — forcing risks bending the stick or cracking the bar.
- Place each demolded bar flat on the lined baking sheet. Return immediately to the freezer. Repeat with the remaining bars.
Phase 4: Second Freeze and Chocolate Dip
- Freeze the demolded bars for at least 2 more hours — overnight is ideal. The bars need to be at their maximum firmness before dipping. If they’re even slightly soft, the chocolate shell will crack as the bar flexes during the dip.
- When ready to dip, pour the Magic Shell into a deep bowl or large measuring cup. Stir or shake the bottle well before pouring — the coconut oil in the Magic Shell separates during storage and needs to be fully reincorporated. The bowl needs to be deep enough to fully submerge each bar with a single dip.
- Working with one bar at a time and keeping all others in the freezer, hold the bar by the stick and lower it into the Magic Shell until fully submerged. Lift it out slowly and hold it over the bowl for a few seconds to let the excess drip off. The Magic Shell will begin hardening within 5 to 10 seconds of contact with the frozen bar.
- Place the dipped bar back on the lined baking sheet and allow the chocolate shell to harden completely, about 30 to 60 seconds. It will go from shiny to matte as it sets.
- Return to the freezer immediately. Repeat with the remaining bars.
- Freeze the finished bars for at least 30 minutes before serving to ensure the chocolate shell is fully bonded to the ice cream. Serve directly from the freezer.
Chef Tips for Perfect Results
Work in a cold kitchen. On a hot day, the ice cream softens faster than you can work. If your kitchen is warm, chill your mixing bowls, your baking sheet, and even your scoop in the freezer for 10 minutes before starting. Every degree of extra cold you introduce into the process buys you more working time.
Use high-quality vanilla bean ice cream. The ice cream is the bulk of this bar and its flavor is what you taste in most bites. A premium vanilla with visible bean specks — Haagen-Dazs, Tillamook, or a good store brand — tastes significantly richer and more complex than a budget ice cream. The difference is most noticeable in a frozen bar where there’s no sauce or topping to compensate for a flat ice cream flavor.
Warm the hot fudge slightly before piping. Jarred hot fudge is thick and can be difficult to pipe cleanly, especially if it’s cold from the refrigerator. Microwave it for 10 to 15 seconds before transferring to the piping bag. Warm fudge flows through the bag more easily and creates a cleaner, more defined ring in the finished bar.
Keep the Magic Shell warm during dipping. If the Magic Shell gets cold during the dipping process, it thickens and creates an uneven coating. Keep the bowl of Magic Shell in a warm spot in the kitchen, or set it briefly over a bowl of warm water between bars if it starts to thicken.
Add a second dip for a thicker shell. For a thicker, more substantial chocolate coating — closer to the original DQ experience — dip each bar, let the first coat harden completely (30 to 60 seconds), then dip a second time. Return to the freezer after the second coat. The double-dip produces a shell with a satisfying snap when you bite into it.
Common Mistakes to Avoid
Not having everything ready before the ice cream comes out. Ice cream softens faster than most people expect at room temperature, especially in a warm kitchen. If you spend five minutes searching for the popsicle sticks after the ice cream is already out, the first layer will be too soft to hold the stick upright. Prep everything before the freezer opens.
Using warm water for demolding. Warm water melts the surface of the ice cream within seconds and creates a wet, soft exterior that the Magic Shell won’t adhere to cleanly. Cool water does the job — 10 seconds is all it takes for the cup to release without compromising the bar.
Dipping bars that aren’t fully frozen. A bar with any softness in the ice cream flexes during dipping, which cracks the Magic Shell as it hardens and creates gaps in the coating. The second freeze — at least 2 hours after demolding — ensures the bar is firm enough for a clean, uncracked chocolate shell.
Overfilling the cups. Filling the cups past the rim means the ice cream mound at the top won’t be covered by the chocolate shell when the bar is inverted and dipped. Keep the ice cream level with or just slightly below the rim of the cup for complete chocolate coverage on the finished bar.
Not stirring the Magic Shell. The coconut oil base in Magic Shell separates during storage and creates an uneven coating if poured directly without stirring. Stir vigorously or shake the bottle for 30 seconds before pouring into the dipping bowl every time you use it.
Variations and Substitutions
Chocolate ice cream base: Replace the vanilla bean ice cream with chocolate ice cream for a double-chocolate version. The combination of chocolate ice cream, hot fudge ribbons, and chocolate shell produces an intensely chocolatey bar that’s excellent alongside the salted peanuts.
Different nuts: Cashews, almonds, or pecans all work in place of peanuts for different flavor and texture profiles. Cashews are milder and creamier. Almonds add a crunchier, more toasted note. Pecans bring a buttery richness. All should be salted for the same sweet-salty balance that makes the original so compelling.
Caramel instead of hot fudge: Swap the hot fudge for thick caramel sauce for a salted caramel peanut version. The caramel and peanut combination has a natural affinity — think Snickers in frozen bar form — and the Magic Shell chocolate coating ties it together perfectly.
Peanut butter ribbon: Add a tablespoon of creamy peanut butter melted with a teaspoon of coconut oil and piped alongside the hot fudge for a peanut butter ribbon through the bar. The combination of peanut butter, chocolate, and salted peanuts is a natural crowd-pleaser.
Serving Suggestions
Serve directly from the freezer — there’s no rest time needed since these are eaten frozen. Unwrap or present in the paper cup with the top torn down for a classic ice cream bar presentation. For a party, arrange the finished bars in a large container filled with dry ice or in the freezer and let guests grab their own.
Pair with other homemade frozen treats for a summer dessert spread: ice cream sandwiches, frozen fruit bars, and these Buster Bars on a table together make an impressive and crowd-pleasing dessert station that requires no last-minute plating or serving.
Storage
Freezer: Wrap each finished bar individually in plastic wrap or store in an airtight freezer container. Properly wrapped bars keep for up to 10 days without the ice cream developing freezer burn or the chocolate shell absorbing off-flavors from the freezer. After 10 days the quality begins to decline — the ice cream can develop icy crystals and the chocolate shell can become slightly waxy in texture.
Nutritional Information
| Nutrient | Per Bar |
|---|---|
| Calories | 824 |
| Protein | 16g |
| Carbohydrates | 102g |
| Fat | 40g |
| Saturated Fat | 20g |
| Fiber | 5g |
| Sugar | 74g |
| Sodium | 497mg |
| Cholesterol | 105mg |
| Potassium | 792mg |
Nutritional values are estimates based on standard ingredient brands. Values will vary depending on the specific ice cream and hot fudge used.
FAQ
Where do I find popsicle sticks?
Craft stores carry them in large packs inexpensively — a bag of 100 costs a few dollars and gives you enough for many batches. They’re also available at most grocery stores in the baking section alongside cupcake liners and cake decorating supplies, and online. Wooden craft sticks are identical to the sticks used in commercial frozen bars and hold up well in the freezer without warping or cracking.
Can I use homemade hot fudge instead of jarred?
Yes, and homemade hot fudge is noticeably richer and more flavorful than most jarred versions. A basic recipe of heavy cream, butter, dark chocolate, cocoa powder, and sugar cooked together takes about 10 minutes and produces a thick, glossy fudge that pipes cleanly and tastes far better than the commercial alternative. Make it ahead and refrigerate it — it thickens further when cold, which actually makes it easier to pipe into the bars without it running.
What if my Magic Shell is too thick to dip smoothly?
Magic Shell thickens when it gets cold and also when the coconut oil hasn’t been fully incorporated. First, stir vigorously — 30 seconds of active stirring usually fixes a separation issue. If it’s still too thick, set the bowl briefly over warm (not hot) water for a minute, stirring as it warms. Don’t microwave it directly — uneven heating can make it too thin in some spots and still thick in others.
Can I make these ahead for a party?
These are ideal make-ahead party desserts. You can make them up to a week ahead and store them wrapped in the freezer. The longer freeze actually benefits the bars — they become extremely firm and the chocolate shell bonds more completely to the ice cream. Bring them out of the freezer right as you’re ready to serve and unwrap or peel the cups for guests.
Why did my chocolate shell crack after dipping?
Cracking during or after dipping almost always means the bars weren’t frozen firmly enough before dipping. Even slight softness in the ice cream causes the bar to flex as you lower it into the Magic Shell, and that flex breaks the coating as it hardens. Return any cracked bars to the freezer for another 2 hours, then re-dip the cracked areas with a small amount of Magic Shell applied with a spoon to seal the gaps.
Conclusion
Copycat Buster Bars are a project that pays off completely. The process takes patience and a few hours of freeze time, but the result is a homemade frozen bar that’s richer, bigger, and more satisfying than anything from a drive-thru window. Make a batch on a weekend, store them in the freezer, and you have an impressive dessert ready for the entire week — or something special to pull out whenever the craving hits. Once you’ve made them at home, it’s hard to go back to the original.