
There’s something undeniably magical about the swirl of red velvet intertwined with creamy cheesecake in these delightful Red Velvet Cream Cheese Brownies. I remember the first time I made these; it was a chilly Sunday afternoon, and my kids were huddled around the kitchen table, eagerly waiting to taste test the gooey goodness. The sweet aroma wafting through the house made it feel like the coziest, most welcoming home. These brownies have since become a cherished family tradition, perfect for gatherings or simply as a comforting treat on a quiet evening.
Why You’ll Love These Brownies
Decadent Flavor
The combination of rich cocoa and tangy cream cheese is a match made in dessert heaven. The depth of cocoa melds beautifully with the slight tanginess of cream cheese, creating a harmony of flavors that dance on your palate. Each bite is a journey through layers of taste, from the initial sweetness to the subtle tang and the lingering richness of chocolate. This complexity makes these brownies not just a dessert but an experience to be savored.
Easy to Make
With simple ingredients and straightforward steps, even a novice baker can master these brownies. The recipe is designed to be foolproof, with clear instructions that guide you through each stage. Whether you’re a seasoned baker or just starting, you’ll find joy in the process and satisfaction in the results. The ease of preparation means more time to enjoy the delicious outcome with family and friends.
Stunning Presentation
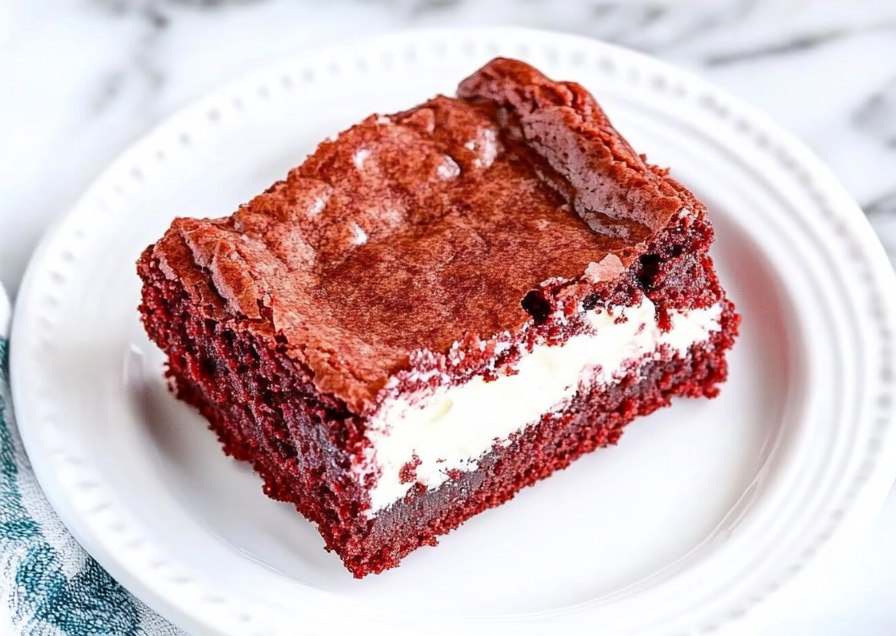
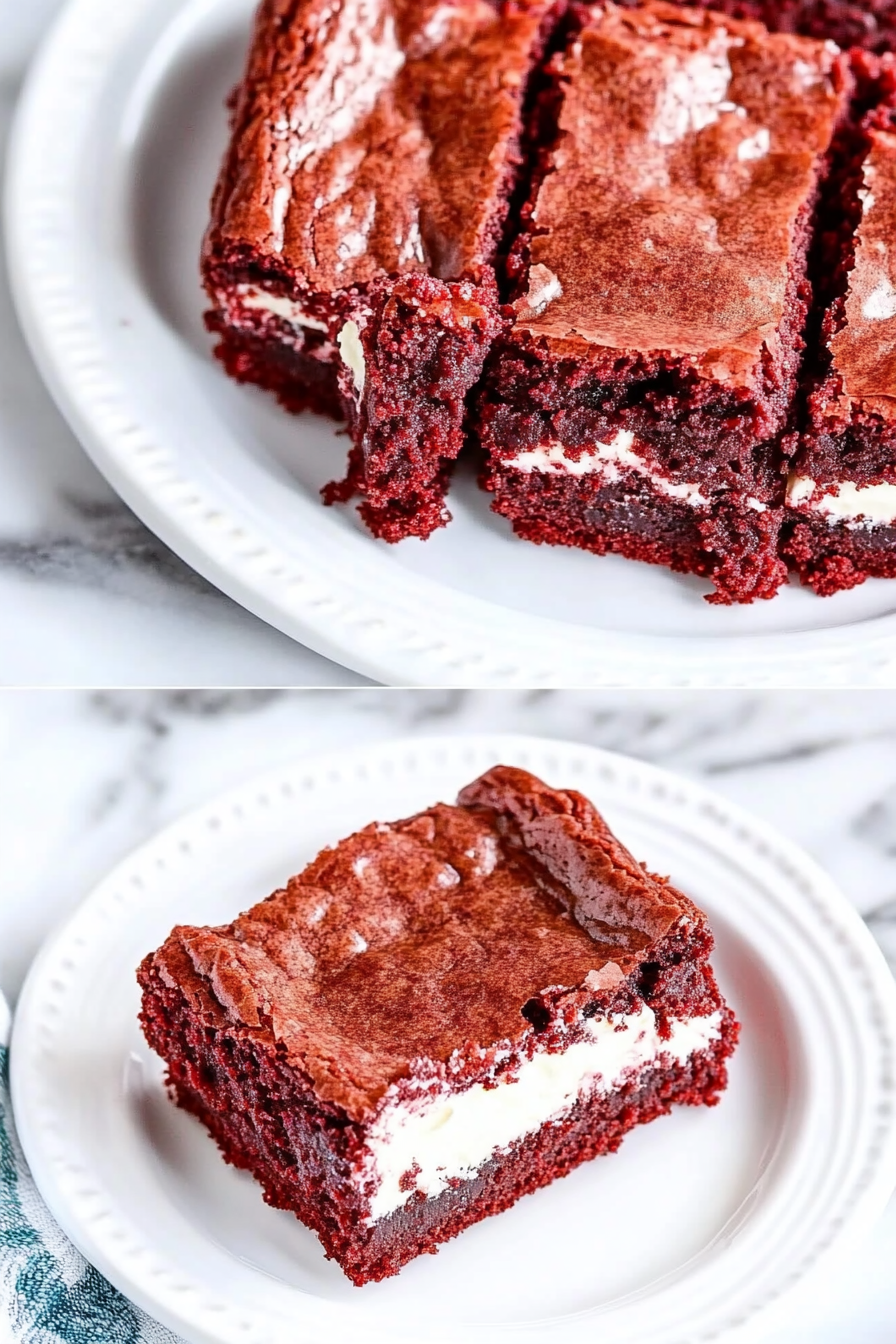
The vibrant red hue swirled with creamy white makes these brownies as beautiful as they are delicious. The visual appeal of these brownies is undeniable; they look like little works of art. The red velvet base provides a striking contrast to the swirls of cream cheese, creating a marbled effect that’s almost too pretty to eat. They make a stunning addition to any dessert table and are sure to catch the eye at any gathering.
Crowd-Pleaser
Ideal for parties, potlucks, or just a family night in, these brownies are sure to impress. Their rich flavor and beautiful appearance make them a hit with people of all ages. Whether you’re serving them to a group of friends or enjoying them with your family, these brownies are guaranteed to bring smiles and requests for seconds. They’re the perfect dessert to bring people together and create lasting memories.
Versatility
Enjoy them as a dessert or a sweet afternoon pick-me-up. These brownies are incredibly versatile and can be enjoyed in many different settings. Serve them as a dessert after a meal, as a sweet treat with coffee or tea, or simply as a midday indulgence to lift your spirits. Their rich flavor and satisfying texture make them a delightful choice anytime you crave something sweet and comforting.
The Recipe
Prep Time: 20 minutes
Cook Time: 24 minutes
Servings: 16 brownies
Calories: Approximately 250 per brownie
Ingredients
For the Cake:
- 1 cup butter, softened
- 2 cups granulated sugar
- 4 eggs
- 1 cup sour cream
- ½ cup milk
- 1 oz liquid red food coloring (or 1 tbsp gel red food coloring)
- 2 tsp vanilla extract
- 2½ cups all-purpose flour
- ½ cup cocoa powder (not Dutch processed)
- 1 tsp baking soda
- ½ tsp salt
For the Cream Cheese Frosting:
- 8 oz cream cheese, softened
- 4 tbsp butter, softened
- 2 tsp sour cream
- 3½ cups confectioner’s sugar
- 2 tsp vanilla extract
Instructions
-
Preheat Your Oven
Preheat your oven to 350°F (175°C). Prepare a 9×13-inch baking pan by lining it with parchment paper or greasing it with butter. This step is essential to ensure even baking and easy removal of the brownies. -
Cream Butter and Sugar
In a large mixing bowl, cream together the butter and sugar until light and fluffy. This process helps to incorporate air, resulting in a lighter texture. Add in the eggs one at a time, mixing well after each addition to ensure a smooth batter. -
Mix Wet Ingredients
Mix in the sour cream, milk, food coloring, and vanilla until fully incorporated. The sour cream adds a moist texture, while the food coloring gives the batter its signature red hue. -
Combine Dry Ingredients
In a separate bowl, whisk together the flour, cocoa powder, baking soda, and salt. Gradually add the dry ingredients to the wet mixture, stirring until just combined. Be careful not to overmix, as this can result in a denser texture. -
Pour and Prepare Batter
Pour the batter into the prepared baking pan, spreading it evenly. This ensures uniform baking and a consistent texture throughout. -
Prepare Cream Cheese Mixture
For the frosting, beat the cream cheese, butter, and sour cream in a mixing bowl until smooth. Gradually add confectioner’s sugar and vanilla, beating until creamy. The cream cheese mixture should be smooth and slightly thick, perfect for swirling. -
Swirl the Mixtures
Drop spoonfuls of the cream cheese mixture over the brownie batter. Use a knife to swirl the two together, creating a marbled effect. This step is where the magic happens, resulting in the beautiful pattern that defines these brownies. -
Bake and Cool
Bake for 24 minutes or until a toothpick inserted in the center comes out clean. Allow to cool before cutting into squares. Cooling is crucial as it allows the flavors to meld and the texture to set, making the brownies easier to slice.
Kitchen Tools You’ll Need
- Large mixing bowl
- Hand mixer or stand mixer
- 9×13-inch baking pan
- Parchment paper or non-stick spray
- Measuring cups and spoons
- Whisk and spatula
These tools ensure a smooth baking process and help achieve the perfect texture and presentation for your brownies.
The Benefits of Each Ingredient
Butter
Butter provides richness and a tender crumb, essential for a moist and flavorful brownie. Its fat content helps create a tender texture and enhances the overall flavor, making it a crucial ingredient in this recipe.
Granulated Sugar
Granulated sugar sweetens and helps create a soft texture. It also contributes to the brownies’ structure, ensuring they hold together while remaining tender and moist.
Eggs
Eggs bind the ingredients and add moisture, giving the brownies their characteristic fudgy texture. They also help with leavening, providing structure and stability to the batter.
Sour Cream
Sour cream adds moisture and a slight tang, enhancing the red velvet flavor. It creates a tender crumb and balances the sweetness, adding depth to the flavor profile.
Cocoa Powder
Cocoa powder is the key to the classic red velvet chocolatey taste. It provides the rich, chocolatey flavor that complements the cream cheese perfectly, making these brownies irresistible.
Cream Cheese
Cream cheese creates the creamy, tangy frosting perfect for balancing sweetness. Its smooth texture and tangy flavor contrast beautifully with the sweet, chocolatey brownie base.
What to Serve With These Brownies
Pair these Red Velvet Cream Cheese Brownies with a scoop of vanilla ice cream or a dollop of whipped cream for an extra indulgent treat. The cool, creamy texture of the ice cream or whipped cream complements the rich, fudgy brownies, creating a delightful contrast.
They also pair beautifully with a hot cup of coffee or a cold glass of milk, making them the perfect dessert after a hearty meal like our Classic Beef Stew or Chicken Pot Pie. The warmth and depth of flavor in these dishes are complemented by the sweet, tangy taste of the brownies, creating a satisfying and well-rounded meal.
Storage & Leftover Tips
Store any leftover brownies in an airtight container at room temperature for up to 3 days. For longer storage, refrigerate them for up to a week. The refrigerator helps preserve their freshness and prevents them from becoming stale.
You can also freeze the brownies for up to 3 months; just ensure they’re well-wrapped to prevent freezer burn. Freezing is an excellent option if you want to prepare these brownies in advance or save some for a later date. When ready to enjoy, simply thaw at room temperature or warm them slightly in the oven for a fresh-out-of-the-oven experience.
A Moment of Joy
These Red Velvet Cream Cheese Brownies are more than just a treat; they’re an experience, a moment of joy shared with loved ones. The process of making them is just as rewarding as the moment you take that first bite. The aroma that fills your kitchen, the anticipation of tasting them fresh from the oven, and the joy of sharing them with family and friends make these brownies truly special.
I hope this recipe brings warmth to your home and smiles to your family’s faces, just as it has to mine. Whether you’re creating new traditions or simply indulging in a moment of sweetness, these brownies are sure to become a favorite in your home. So gather your ingredients, preheat your oven, and prepare to create something magical.
Red Velvet Cream Cheese Brownies
Ingredients
Equipment
Method
- Preheat the oven to 350ºF. Prepare three 8-inch round cake pans by spraying with shortening or softened butter and adding a light coat of flour or cocoa powder. Set aside.
- In a large mixing bowl, cream together the butter and sugar. Beat in the eggs. Mix in the sour cream, milk, food color, and vanilla.
- Slowly blend in the flour, cocoa, baking soda, and salt. Divide the batter between the 3 prepared round cake pans.
- Bake at 350°F for 24 minutes or until a toothpick comes out clean OR until they spring back when gently pressed in the center.
- Allow the cakes to cool for 15 minutes before flipping them out of the pans and onto your work surface. Allow to cool completely before assembling or decorating.
- For the frosting, beat the cream cheese, butter, and sour cream together in a large mixing bowl. Add the confectioner’s sugar and vanilla. Beat until smooth.
- Assembly: Place one layer of cake on a serving dish. Cover the top with 1/3 of the frosting. Add another layer of cake on top of that frosting, followed by another layer of frosting. Add the final layer of the cake and decorate the top with the remaining frosting.