
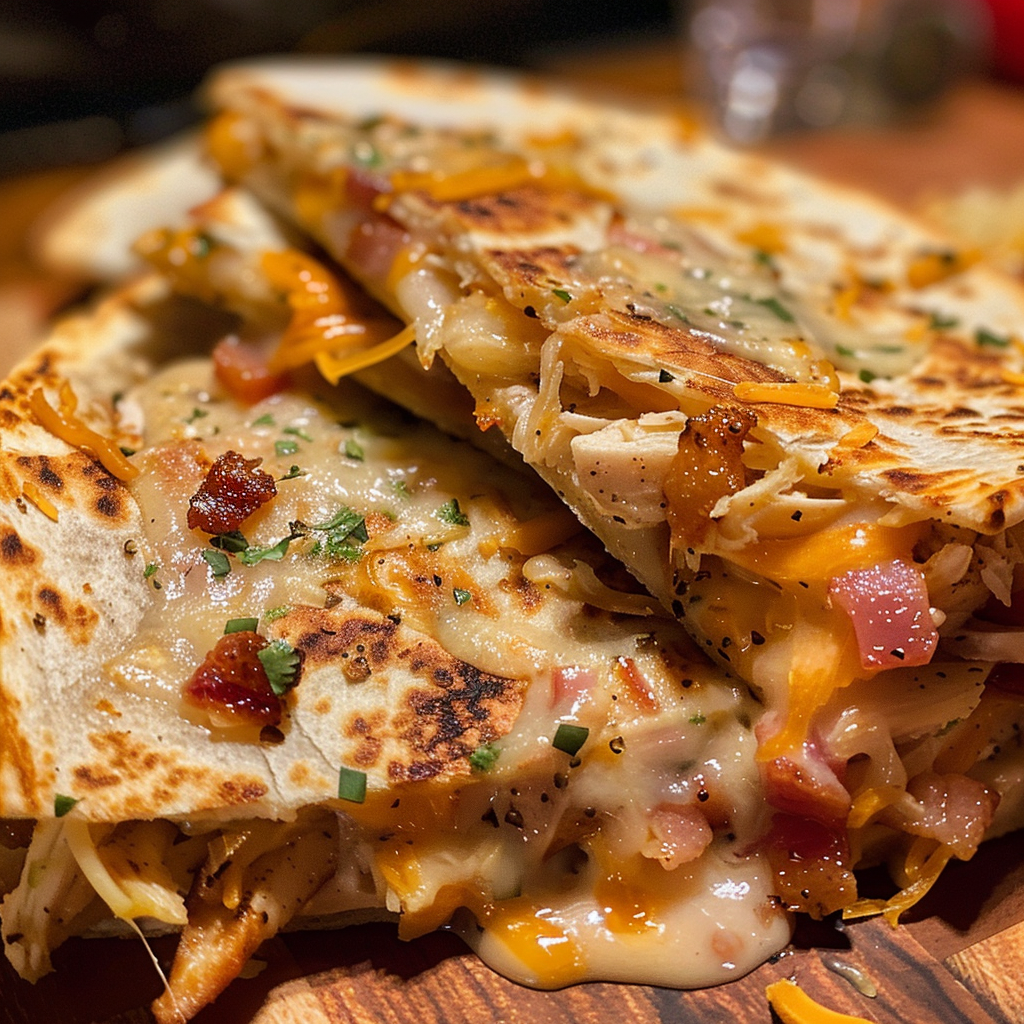
Bacon ranch chicken quesadillas deliver a golden, shatteringly crispy tortilla exterior around a filling that’s loaded with juicy shredded chicken, smoky crumbled bacon, creamy ranch dressing, and gooey melted cheddar. This is a 15-minute recipe that tastes like something you’d order at a restaurant and can’t stop eating once it’s in front of you.
| Detail | Info |
|---|---|
| Prep Time | 5 minutes |
| Cook Time | 10 minutes |
| Total Time | 15 minutes |
| Servings | 4 |
| Difficulty | Easy |
| Cuisine | American / Tex-Mex |
Why This Recipe Works
The combination of ranch dressing and cheddar cheese is what makes this filling work so well. Ranch brings a tangy, herby richness that cuts through the fat of the cheese and balances the smoky depth of the bacon. It acts as both a sauce and a binder, coating the chicken and holding the filling together so nothing slides out when you fold the tortilla or flip it in the pan.
Mixing everything in a bowl before it goes into the tortilla is a simple step that pays off in even flavor distribution. Every bite gets chicken, bacon, cheese, and ranch in roughly the same proportions. If you add the ingredients separately inside the tortilla, you end up with patches of filling that are too heavy in one ingredient and light in another.
The fold-and-press method — spreading filling on half the tortilla and folding the empty half over — makes these far easier to flip than a fully open-faced quesadilla. The folded edge acts as a hinge, and the flat top means you can put real downward pressure on it with a spatula to ensure maximum contact between the tortilla and the pan. That contact is what creates the even, deep golden browning on the surface.
Cooking over medium heat rather than high heat is important. High heat chars the tortilla before the cheese has time to fully melt. Medium heat gives the cheese 2 to 3 minutes per side to become completely molten and cohesive while the tortilla simultaneously develops color and crunch. The patience required is modest, and the result is noticeably better.
Using a dry pan or a very light coating of butter on the outside of the tortilla — rather than oil in the pan — gives you cleaner, more even browning. Oil tends to pool in spots and create an uneven fry. A light butter brush on the tortilla surface distributes the fat exactly where you want it.
Ingredients
| Ingredient | Quantity | Notes |
|---|---|---|
| Cooked chicken, shredded | 1 pound | Rotisserie chicken is ideal; thigh meat stays juicier than breast |
| Shredded cheddar cheese | 1 cup | Sharp cheddar recommended; freshly shredded melts more smoothly |
| Cooked bacon, crumbled | 1/2 cup | About 5 to 6 strips; thick-cut adds more texture |
| Ranch dressing | 1/4 cup | Full-fat bottled ranch works; homemade is even better |
| Large flour tortillas | 8 | 10-inch tortillas give the best surface area for the filling |
Step-by-Step Instructions
Phase 1: Make the Filling
- Shred the cooked chicken into bite-sized pieces using two forks or your hands. Aim for medium shreds — not too fine, not too chunky — so the filling has texture and substance without being difficult to eat.
- In a large mixing bowl, combine the shredded chicken, shredded cheddar cheese, crumbled bacon, and ranch dressing. Stir until all the ingredients are evenly coated and combined. The ranch should lightly coat everything without the filling looking wet or soupy. If it seems dry, add another tablespoon of ranch.
Phase 2: Cook the Quesadillas
- Heat a large skillet over medium heat. No oil is needed — the fat from the cheese will render as it melts and help the tortilla brown naturally. If you prefer extra crispness, brush the outside of the tortilla lightly with melted butter before placing it in the pan.
- Lay one tortilla flat in the skillet. Spread a generous portion of the chicken filling over one half of the tortilla, leaving a small border near the curved edge so the filling doesn’t spill when folded.
- Fold the empty half of the tortilla over the filled half and press down gently but firmly with a spatula. This ensures full contact between the two layers and helps the cheese begin melting immediately.
- Cook for 2 to 3 minutes without moving it. Resist the urge to peek underneath too early — let the tortilla develop color. When you can see the edges turning golden and the bottom feels firm when you lift it slightly, it’s ready to flip.
- Flip the quesadilla carefully and press down again with the spatula. Cook for another 2 to 3 minutes until the second side is equally golden and the cheese is fully melted throughout.
- Transfer to a cutting board and let it rest for 30 seconds before slicing. This brief rest keeps the cheese from oozing out immediately when cut.
- Slice into 3 triangular wedges using a sharp knife or a pizza wheel. Repeat with the remaining tortillas and filling.
Chef Tips for Perfect Results
Use rotisserie chicken from the store. It’s the single biggest time-saver in this recipe and delivers better flavor than plain boiled or poached chicken breast because it’s been roasted with seasoning and fat. Pull the meat while it’s still slightly warm — it shreds more easily and the shreds stay more tender.
Lightly brush the outside of the tortillas with butter. This optional step takes 10 seconds and makes a substantial difference. The butter promotes even browning across the entire surface and adds a slightly richer flavor to the crispy exterior. A pastry brush or even a paper towel dipped in melted butter works fine.
Don’t overfill. A 10-inch tortilla can hold about a third of a cup of filling comfortably on the half that gets covered. More than that and the quesadilla won’t press flat, won’t brown evenly, and will be nearly impossible to flip without the filling sliding out.
Keep finished quesadillas warm. If you’re cooking multiple quesadillas in batches, place them on a baking sheet in a 200-degree F oven to stay warm while you finish the rest. They hold their crispness well for 15 to 20 minutes at that temperature.
Let the cheese come to room temperature. Cold cheese from the refrigerator takes longer to melt and can leave unmelted spots even when the tortilla is fully browned. Pulling it out 10 to 15 minutes before cooking makes the melting process faster and more even.
Common Mistakes to Avoid
Cooking over high heat. High heat burns the outside before the inside has time to heat through and the cheese has time to melt. You end up with a charred tortilla and cold, unmelted filling. Medium heat is the right call — it takes the same total time but produces a dramatically better result.
Moving the quesadilla around in the pan. Leave it alone. Every time you slide it around, you interrupt the browning process and risk the filling shifting. Set it down, press once, and don’t touch it again until it’s time to flip.
Flipping too early. If the quesadilla sticks or feels soft when you try to flip it, it needs more time. A properly browned quesadilla releases cleanly from the pan without sticking. If it’s sticking, give it another 30 seconds.
Skipping the rest before slicing. Slicing immediately after it comes off the heat causes the melted cheese to pour out of the cut edges. Thirty seconds is all it needs to firm up enough to hold its shape when cut.
Using cold chicken straight from the fridge. Cold chicken in the center of the quesadilla makes it harder for the filling to heat through in the 4 to 6 minutes total cooking time. Letting the shredded chicken sit at room temperature for 10 minutes before mixing the filling ensures everything heats evenly.
Variations and Substitutions
Different cheeses: Pepper Jack adds heat and has a great melt. Monterey Jack is mild and creamy. Mozzarella gives you a stringy, pizza-adjacent pull that kids love. A Mexican four-cheese blend is a reliable all-purpose option that works in nearly any quesadilla.
BBQ ranch filling: Replace half the ranch dressing with your favorite barbecue sauce. The tangy-sweet smokiness pairs exceptionally well with the bacon and gives the filling a distinctly different but equally appealing flavor profile.
Add sauteed vegetables: Diced red onion and bell pepper cooked in the same pan before you start the quesadillas add sweetness, color, and a slight char that complements the smoky bacon. Make sure they’re fully cooked and not too wet before adding them to the filling.
Turkey bacon: A leaner substitute that works well and has improved significantly in quality over the years. It doesn’t render as much fat as pork bacon, so the filling will be slightly less rich, but the flavor still reads as smoky and savory.
Gluten-free: Swap in gluten-free flour tortillas. They handle and cook almost identically to regular flour tortillas and are widely available in most grocery stores.
Serving Suggestions
Lay the sliced wedges out on a board or platter with dipping options in small bowls alongside. Ranch dressing is the natural first choice given it’s already in the filling. Salsa and fresh pico de gallo add brightness and acidity. Guacamole and sour cream provide cool, creamy contrast to the hot, crispy quesadilla. A bowl of pickled jalapeños on the side lets everyone adjust the heat to their preference.
For a fuller meal, pair with a simple green salad, a bowl of black bean soup, or Mexican rice. These quesadillas also work well as a game-day appetizer cut into smaller wedges and arranged around a central bowl of dipping sauce.
Storage and Reheating
Refrigerator: Store cooled quesadillas in an airtight container with parchment paper between the layers to prevent sticking. They keep for up to 3 days. Expect the tortilla to soften as it sits — the crispy exterior is best the day they’re made.
Freezer: Wrap individual quesadillas tightly in plastic wrap, then in aluminum foil, and freeze for up to 2 months. Thaw overnight in the refrigerator before reheating.
Reheating: The best method for restoring crispness is a dry skillet over medium heat for 2 to 3 minutes per side. An air fryer at 375 degrees F for 3 to 4 minutes is equally good and requires less attention. The microwave is the fastest option but results in a soft, slightly chewy tortilla rather than a crispy one — fine for a quick meal, but not the same experience as freshly made.
Nutritional Information
| Nutrient | Per Serving (2 wedges, approx.) |
|---|---|
| Calories | 520 |
| Protein | 38g |
| Carbohydrates | 30g |
| Fat | 26g |
| Saturated Fat | 11g |
| Fiber | 1g |
| Sodium | 840mg |
Nutritional values are estimates based on standard ingredients. Values will vary depending on specific brands and portion sizes.
FAQ
What is the best way to get the tortilla really crispy?
Two things matter most: a dry or lightly buttered pan (not oil), and patient medium heat. Butter on the outside of the tortilla rather than oil in the pan gives you the most even, consistent browning across the entire surface. Medium heat lets the exterior crisp gradually while the cheese inside melts completely. High heat rushing the process is the main reason quesadillas come out uneven and blotchy.
Can I use corn tortillas instead of flour?
You can, but the technique changes. Corn tortillas are smaller and less pliable, so they’re better suited to the traditional flat quesadilla style where filling goes between two whole tortillas rather than the fold-over method. They also absorb butter and fat more readily, so use a lighter hand with any added butter. The flavor is excellent — earthier and more complex than flour tortillas.
How do I cook multiple quesadillas at once?
A large griddle that spans two burners is the most efficient tool. Otherwise, use two skillets simultaneously. Keep finished quesadillas in a 200-degree F oven on a baking sheet while the remaining ones cook. Don’t stack them on top of each other — the steam trapped between them softens the tortillas quickly.
Can I make the filling in advance?
Yes. The chicken, bacon, cheese, and ranch mixture can be made up to 24 hours ahead and stored covered in the refrigerator. When you’re ready to cook, let it sit at room temperature for 10 minutes before filling the tortillas. Cold filling straight from the refrigerator takes longer to heat through in the pan and can result in a warm tortilla with a lukewarm center.
What’s the best ranch dressing to use?
Any full-fat bottled ranch works. Hidden Valley Original is the most common choice and delivers a clean, familiar flavor. For a step up, make a quick homemade version with mayo, buttermilk, garlic powder, onion powder, dried dill, and parsley — it takes 5 minutes and has noticeably brighter flavor. Avoid fat-free ranch in this recipe; it’s thinner and doesn’t bind the filling as effectively.
Conclusion
Bacon ranch chicken quesadillas are the rare recipe that punches well above its effort level. Fifteen minutes, five ingredients, one skillet, and you have something genuinely satisfying — crispy, cheesy, smoky, and rich in every bite. Whether it’s a quick lunch, a casual dinner, or the centerpiece of a game-day spread, this recipe is one you’ll come back to again and again without needing any convincing.