
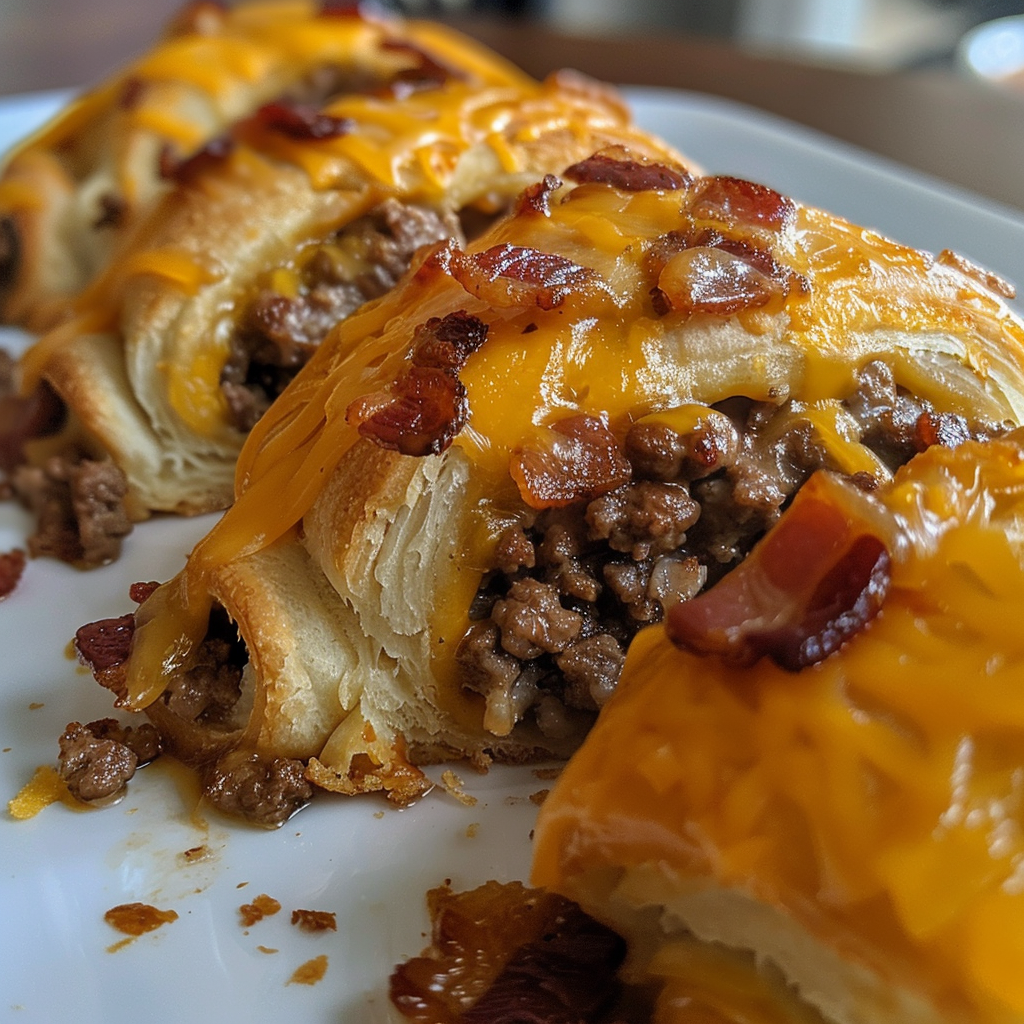
Garlic butter bacon cheeseburger rollups take everything you love about a loaded cheeseburger and wrap it inside flaky, buttery crescent dough. The outside crisps to a deep golden brown while the inside stays molten with sharp cheddar, seasoned beef, and smoky crumbled bacon. These are the kind of snack that clear a plate before they even cool down.
| Detail | Info |
|---|---|
| Prep Time | 15 minutes |
| Cook Time | 15 minutes |
| Total Time | 30 minutes |
| Servings | 6 to 8 |
| Difficulty | Easy |
| Cuisine | American |
Why This Recipe Works
The genius here is structural. Crescent roll dough gives you a pre-laminated, butter-enriched pastry that puffs and crisps in the oven without any special technique. You don’t need to make pastry from scratch or worry about resting times. The dough does its job reliably, and the garlic butter wash on the outside pushes it from pale and soft to shatteringly crisp and deeply flavored.
Layering the filling in the right order matters. Beef goes down first because it’s the heaviest component and acts as an anchor. Bacon goes next, and the cheese goes on top — which means it melts down through the bacon and into the beef as the rollup bakes, binding everything together rather than pooling in one spot.
The 80/20 ground beef blend is deliberate. The fat that renders out of the beef during browning carries the seasoning and keeps the meat from tasting dry after it’s been rolled up and baked a second time. Leaner beef tends to turn crumbly and dusty after the double-cook, which no amount of cheese can fully rescue.
Draining the cooked beef thoroughly before adding it to the dough keeps the crust from going soggy. Excess grease soaks into the crescent dough during baking and prevents it from getting that clean, defined flake. A quick transfer to a paper towel-lined plate for two minutes makes a real difference in the final texture.
Ingredients
| Ingredient | Quantity | Notes |
|---|---|---|
| Ground beef | 1 pound | 80/20 blend for the best flavor and texture |
| Bacon, cooked and crumbled | 8 slices | Thick-cut adds more texture; oven-baked strips stay consistently crisp |
| Shredded cheddar cheese | 1 cup | Sharp cheddar recommended; freshly shredded melts better |
| Refrigerated crescent roll dough | 1 can | Keep it cold until you’re ready to work with it |
| Garlic butter, melted | 2 tablespoons | Make your own by stirring a minced garlic clove into melted butter |
| Salt and black pepper | To taste | Season the beef while it cooks |
Step-by-Step Instructions
Phase 1: Prepare the Components
- Preheat your oven to 375 degrees F. Line a baking sheet with parchment paper and set it aside. The parchment prevents sticking and makes cleanup easy.
- Cook the bacon until crispy using your preferred method. For the most consistent results, lay the strips on a wire rack set over a rimmed baking sheet and bake at 400 degrees F for 18 to 20 minutes. Once cool, crumble into small pieces and set aside.
- Heat a skillet over medium heat and add the ground beef. Cook, breaking it apart as it goes, until fully browned with no pink remaining. Season with salt and black pepper. Drain thoroughly and transfer to a paper towel-lined plate to remove excess grease.
Phase 2: Assemble the Rollup
- Remove the crescent roll dough from the can and unroll it onto the prepared baking sheet. Press the seams together firmly with your fingers to form one even, seamless rectangle. Use a rolling pin to flatten it slightly if needed.
- Spread the cooked and drained ground beef in an even layer over the dough, leaving a half-inch border along all edges. An even layer means every slice gets the same amount of filling.
- Scatter the crumbled bacon over the beef layer, distributing it as evenly as possible.
- Sprinkle the shredded cheddar cheese in an even layer over the bacon. Make sure the cheese reaches all the way to the edges of the filling area so every bite has coverage.
Phase 3: Roll, Seal, and Bake
- Starting from the long edge of the rectangle, carefully roll the dough into a tight log. Work slowly and keep the roll firm so there are no air gaps. Once fully rolled, pinch the seam and the two open ends firmly to seal. Place the log seam-side down on the baking sheet.
- Brush the entire surface of the rollup generously with the melted garlic butter, coating the top, sides, and ends. This is what gives the finished rollup its golden color and savory crust.
- Bake for 12 to 15 minutes until the exterior is a deep golden brown and the dough is cooked through. Keep an eye on it in the last few minutes since crescent dough can go from golden to over-browned quickly.
- Remove from the oven and let the rollup rest on the baking sheet for 3 to 4 minutes before slicing. This rest time lets the cheese inside firm up slightly so slices hold together when you cut them.
- Slice into pinwheel-style rounds using a sharp serrated knife and serve warm.
Chef Tips for Perfect Results
Keep the dough cold. Crescent roll dough that gets warm and soft while you’re working with it becomes sticky and tears easily. Keep it in the refrigerator until you’re ready to use it, and work quickly once it’s out. If it starts sticking to your hands, pop it in the fridge for five minutes before continuing.
Add Worcestershire sauce to the beef. A teaspoon stirred into the ground beef as it cooks adds an umami depth that elevates the flavor without being identifiable as anything specific. It tastes like a better burger.
Seal the edges with water. Dampen your fingertips and run them along the seam and the open ends of the dough before pinching. Moisture activates the gluten and helps the dough bond to itself, so the rollup holds its shape during baking.
Sprinkle herbs on the butter wash. A pinch of dried parsley or a few flakes of flaky sea salt scattered over the garlic butter before baking adds another layer of flavor and makes the rollup look like it came out of a proper bakery.
Use a serrated knife for slicing. A straight-edged knife compresses the rollup as it cuts, squeezing the filling out the sides. A serrated knife saws through cleanly without putting downward pressure on the roll.
Common Mistakes to Avoid
Overfilling the dough. It’s tempting to pile in as much filling as possible, but overstuffing makes the rollup impossible to seal properly and causes the filling to burst out during baking. A generous but even layer that stays well within the border is the goal.
Not draining the beef. Grease pooling inside the rollup steams the dough from the inside rather than letting it bake crisp. Take the extra two minutes to drain and blot the meat before assembling.
Rolling too loosely. A loose roll means air pockets inside, and air pockets mean the layers separate when you slice it. Pull the dough snug with each rotation as you roll.
Cutting too soon. Slicing a freshly baked rollup straight from the oven sends all the molten cheese pouring out onto the cutting board. A few minutes of rest lets the interior set enough to hold the pinwheel shape.
Using cold cheese. Cheese that goes into the rollup straight from the refrigerator takes longer to melt and may still have cold spots when the dough is fully baked. Letting the shredded cheese sit at room temperature for 10 minutes before assembling ensures it melts completely and evenly.
Variations and Substitutions
Turkey bacon: A leaner option that works well here. The flavor is milder than pork bacon, so a pinch of smoked paprika stirred into the beef compensates for some of that smokiness.
Different cheeses: Mozzarella gives a stretchy, mild result. Pepper Jack adds heat. Gouda melts into a creamy, slightly sweet layer that pairs especially well with the garlic butter wash. A combination of cheddar and mozzarella gives you bold flavor with good melt and stretch.
Puff pastry: A swap for crescent roll dough that gives a flakier, more layered exterior. Puff pastry needs a higher oven temperature — around 400 degrees F — and about the same baking time. Keep it very cold before rolling.
Add vegetables: Finely diced onion, sauteed mushrooms, or diced jalapeños can all go into the filling. Make sure any vegetables are cooked and well-drained before adding — excess moisture makes the dough soggy.
Make it spicy: Stir red pepper flakes or a tablespoon of hot sauce into the cooked beef before assembling. A drizzle of sriracha on the finished slices also works well as a condiment.
Serving Suggestions
These rollups work as a standalone appetizer, a shareable game-day snack, or the main event of a casual dinner. Set out small bowls of dipping sauces alongside — ketchup, yellow mustard, and a garlic aioli cover the classic cheeseburger bases. A tangy burger sauce made from mayo, ketchup, and a splash of pickle juice is excellent here.
For a more complete meal, pair with coleslaw, a green salad, or a bowl of tomato soup. Crispy french fries served alongside make the full cheeseburger experience genuinely irresistible, especially for kids.
Storage and Reheating
Refrigerator: Store cooled slices in an airtight container in the refrigerator for up to 3 days. The dough softens overnight, which is the main tradeoff with storing these.
Freezer: Arrange baked and cooled slices on a baking sheet and freeze until solid, then transfer to a freezer bag. They keep for up to 2 months. Thaw in the refrigerator overnight before reheating.
Reheating: The oven is the best method. Place slices on a baking sheet and warm at 350 degrees F for 5 to 7 minutes. This restores the crispness of the exterior in a way the microwave cannot. If you’re short on time, the microwave works for a quick 30-second blast, though the dough will be soft rather than crisp.
Make-ahead option: Assemble the full rollup, wrap it tightly in plastic wrap, and refrigerate unbaked for up to 12 hours. Brush with garlic butter and bake directly from the refrigerator, adding 2 to 3 minutes to the baking time.
Nutritional Information
| Nutrient | Per Serving (approx.) |
|---|---|
| Calories | 380 |
| Protein | 22g |
| Carbohydrates | 18g |
| Fat | 24g |
| Saturated Fat | 10g |
| Fiber | 0g |
| Sodium | 620mg |
Nutritional values are estimates and will vary based on specific ingredients and brands used.
FAQ
Can I assemble these ahead of time?
Yes. Assemble the full rollup, wrap it tightly in plastic wrap, and keep it in the refrigerator for up to 12 hours before baking. When you’re ready, brush with garlic butter and bake straight from cold, adding a couple of minutes to the total baking time. Do not add the garlic butter wash until right before it goes into the oven.
How do I keep the rollup from unrolling in the oven?
Two things: a firm, tight roll with no air gaps, and placing it seam-side down on the baking sheet. Gravity and the baking process press the seam into the pan, keeping it sealed. Moistening the seam edge with a little water before the final pinch also helps the dough bond to itself.
Can I use a different type of dough?
Puff pastry is a great alternative and gives a flakier result. Pizza dough also works and gives a chewier, bread-like texture. Adjust the baking time based on the dough you choose — pizza dough typically needs more time than crescent roll dough to bake through completely.
What dipping sauces work best?
Classic burger condiments translate naturally here. Ketchup, yellow mustard, and mayonnaise are the simple options. A homemade burger sauce of mayo, ketchup, relish, and a splash of vinegar is excellent. Ranch dressing and honey mustard also pair well with the garlic butter and cheddar flavors.
Can I make mini versions for appetizers?
Absolutely. Instead of one large rollup, divide the dough into individual triangles as they come from the can, add a spoonful of filling to each, and roll them up as crescent rolls. Brush with garlic butter and bake for 10 to 12 minutes. You get individual portions that are easier to serve at a party without needing to slice.
Conclusion
Garlic butter bacon cheeseburger rollups deliver maximum flavor with minimal fuss. The combination of seasoned beef, crispy bacon, sharp cheddar, and buttery flaky dough is straightforward and absolutely satisfying. Make them for game day, bring them to a potluck, or put them on a weeknight dinner table and watch them disappear. The recipe is simple enough that you’ll have it memorized after the first time.