
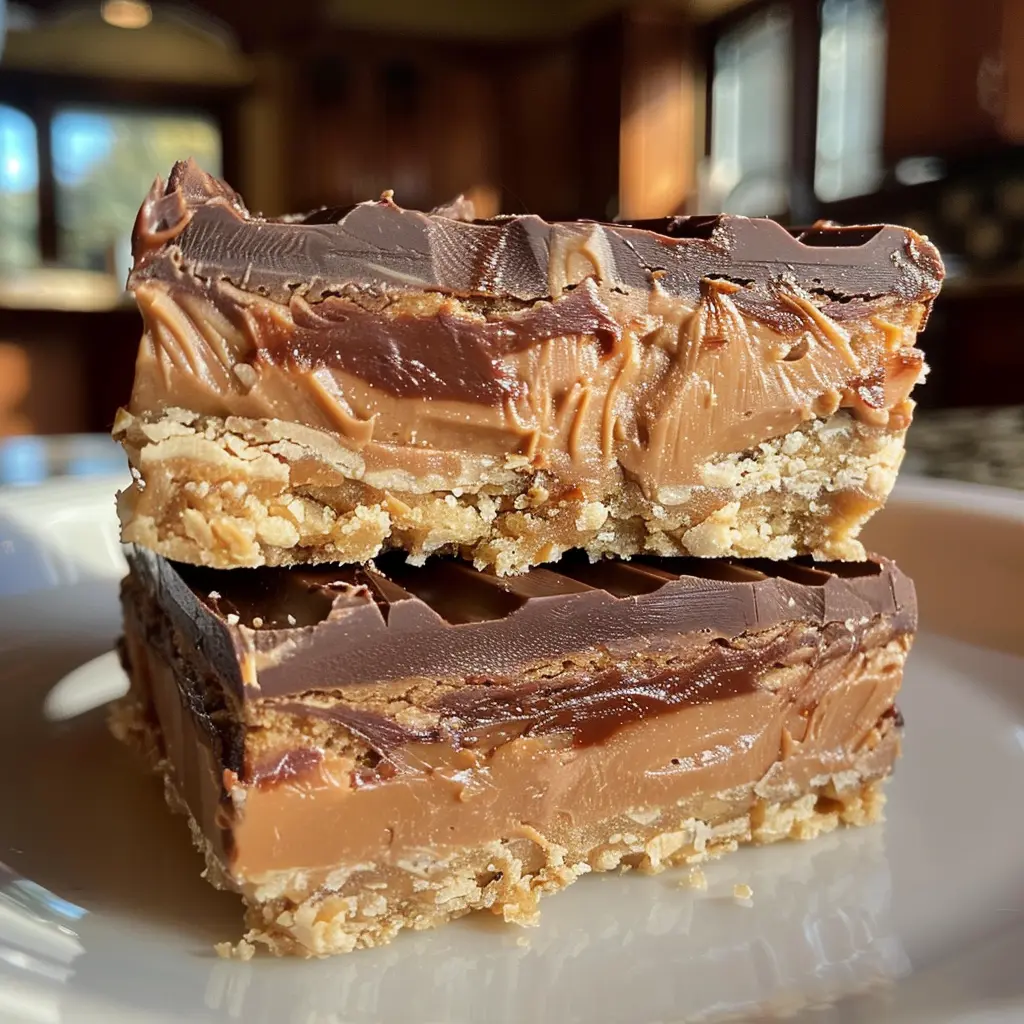
Reese’s peanut butter cup fudge builds a thick chocolate fudge base from melted chocolate chips and sweetened condensed milk, spreads a dense peanut butter filling made from creamy peanut butter, butter, powdered sugar, and graham cracker crumbs over it, tops with the remaining chocolate, and chills until set. Sliced into squares, every piece is a layered cross-section of smooth chocolate fudge and a peanut butter center that tastes exactly like the inside of a Reese’s cup — which is, naturally, the whole point.
| Detail | Info |
|---|---|
| Prep Time | 20 minutes |
| Chill Time | 2 to 4 hours (or overnight) |
| Total Time | About 4 hours including chill |
| Servings | 24 to 36 pieces |
| Difficulty | Easy |
| Cuisine | American |
Why This Recipe Works
Sweetened condensed milk melted with the chocolate chips produces a chocolate fudge layer with a specific texture that plain melted chocolate or chocolate ganache can’t replicate for this application. Sweetened condensed milk is milk that’s been cooked until roughly 60 percent of its water content has evaporated, producing a thick, very sweet dairy product with concentrated milk proteins and sugars. When melted with chocolate chips, the condensed milk’s proteins and sugars form a stable matrix that, when chilled, sets to a dense, creamy, sliceable fudge rather than a hard chocolate slab or a soft ganache. The result holds its shape at room temperature, slices cleanly, and has the exact fudge-like density that makes the bottom and top layers of this recipe so satisfying.
Graham cracker crumbs in the peanut butter filling is the ingredient that most closely replicates the interior texture of an actual Reese’s peanut butter cup. The filling inside a Reese’s cup has a slightly dry, slightly crumbly texture that’s distinct from pure peanut butter — it’s not sticky or loose but dense and slightly grainy in the best possible way. Graham cracker crumbs mixed into the peanut butter, butter, and powdered sugar filling absorb the fat from the peanut butter and the moisture from the butter, producing a filling that’s smooth enough to spread in an even layer but has the slightly firm, crumbly peanut butter cup interior texture. Without the graham cracker crumbs, the filling is too soft and loose; with them, it’s a convincing replica of the candy it’s inspired by.
Softened butter in the peanut butter layer rather than melted butter is the fat preparation choice that produces the right filling texture. Melted butter would make the filling too loose and liquid — it would flow rather than hold its shape as a distinct layer when the second chocolate layer is poured over it. Softened butter blends with the peanut butter into a thick, spreadable mixture that firms further when the powdered sugar and graham cracker crumbs are incorporated and becomes stable enough to support the weight of the top chocolate layer without sinking or mixing into it.
The layering sequence — chocolate, peanut butter, chocolate — is engineered to produce the most visually striking and structurally stable result. The first chocolate layer goes in warm and sets as the bottom foundation during the assembly of the peanut butter layer. Spreading the peanut butter filling over a slightly cooled (but not fully set) first chocolate layer allows the two layers to bond at their interface rather than sitting as completely separate components that might slide apart when sliced. The final chocolate layer poured over the peanut butter filling seals the top and produces a clean, even chocolate surface. The chilling period then firms all three layers together into a cohesive, stackable fudge.
Vanilla extract and salt in the chocolate layer are the two additions that prevent the sweetened condensed milk and chocolate chip combination from tasting one-dimensionally sweet. Three cups of chocolate chips combined with fourteen ounces of sweetened condensed milk is an intensely sweet mixture — the vanilla adds aromatic complexity that makes the chocolate taste more developed, and the salt amplifies the chocolate’s natural flavor and cuts the sweetness in the same way a pinch of salt in any dessert makes the other flavors register more clearly. Both additions are small in quantity and large in impact.
Ingredients
| Ingredient | Quantity | Notes |
|---|---|---|
| Chocolate Fudge Layers | ||
| Chocolate chips | 3 cups | Semi-sweet or dark; semi-sweet most closely matches Reese’s cup chocolate |
| Sweetened condensed milk | 14 oz (1 can) | Full can; the fudge base that produces the dense, creamy texture |
| Vanilla extract | 1 teaspoon | Adds aromatic complexity to the chocolate layer |
| Salt | 1/4 teaspoon | Amplifies the chocolate flavor and cuts sweetness |
| Peanut Butter Filling | ||
| Creamy peanut butter | 1.5 cups | Commercial style (Jif or Skippy); natural peanut butter can produce inconsistent texture |
| Butter, softened | 1/2 cup | Softened, not melted; provides richness and binding without making the filling too loose |
| Powdered sugar | 2 cups | Sifted; sweetens and firms the filling |
| Graham cracker crumbs | 1 cup | The texture element that replicates the interior of a Reese’s cup |
Step-by-Step Instructions
Phase 1: Make the Chocolate Fudge Base
- Line a 9×13-inch baking dish (for thinner pieces) or 9×9-inch dish (for thicker pieces) with parchment paper, leaving overhang on the sides to use as handles when lifting the fudge out later. Lightly grease the parchment.
- Combine the chocolate chips and sweetened condensed milk in a medium saucepan over medium-low heat. Stir constantly until the chocolate is completely melted and the mixture is smooth and uniform. Alternatively, combine in a microwave-safe bowl and microwave in 30-second intervals, stirring between each, until smooth.
- Remove from heat and stir in the vanilla extract and salt.
- Spread slightly more than half of the chocolate mixture (about two-thirds) into the prepared baking dish in an even layer. Reserve the remaining chocolate for the top layer. Set the reserved chocolate aside and allow the base layer to cool for 5 to 10 minutes while you prepare the peanut butter filling.
Phase 2: Make the Peanut Butter Filling
- In a large bowl, combine the creamy peanut butter, softened butter, sifted powdered sugar, and graham cracker crumbs. Mix with a spatula or hand mixer until completely smooth and uniform — no streaks of butter remaining and the graham cracker crumbs fully incorporated. The mixture should be thick and moldable, like a dense cookie dough.
- Spread the peanut butter filling evenly over the slightly cooled chocolate base, pressing it gently into an even layer that reaches the edges of the dish. Use an offset spatula or the back of a spoon dampened with water if the filling sticks.
Phase 3: Top and Chill
- Gently rewarm the reserved chocolate if it has thickened and become difficult to spread — 15 to 20 seconds in the microwave or briefly over low heat. Pour it over the peanut butter layer and spread evenly to cover the entire surface.
- Refrigerate for at least 2 hours, or until the fudge is completely firm throughout. Overnight chilling produces the cleanest cuts.
- Use the parchment overhang to lift the fudge out of the dish onto a cutting board. Cut into squares with a sharp knife. For the cleanest cuts, warm the knife blade under hot water and wipe dry between each cut.
Chef Tips for Perfect Results
Use semi-sweet chocolate chips for the most authentic Reese’s flavor. Dark chocolate produces a more intense, slightly bitter chocolate layer that many people find excellent but noticeably different from the milk-chocolate character of an actual Reese’s cup. Semi-sweet most closely bridges the gap between the two. Milk chocolate chips work well for a sweeter, softer chocolate layer.
Warm the knife for clean cuts. Cold fudge cut with a cold knife can crack or crumble rather than slicing cleanly. Running the knife blade under hot water and wiping it dry immediately before each cut produces clean, smooth slices with no splitting. This single technique is the difference between photogenic fudge squares and ragged ones.
Use commercial peanut butter. Natural peanut butter with separated oil produces an unstable filling that can be greasy or inconsistent in texture. Jif, Skippy, or any fully homogenized commercial creamy peanut butter produces reliable, smooth results.
Chill overnight for the best texture and cleanest cuts. Two hours produces a set fudge, but overnight chilling allows all three layers to fully firm and bond, producing cleaner cross-sections when sliced and a more cohesive fudge that holds together rather than the layers separating at the interfaces.
Add a sprinkle of flaky sea salt over the top chocolate layer. A light scatter of flaky salt over the warm top chocolate layer before chilling adds a textural and flavor element that makes the finished fudge taste more sophisticated and amplifies the chocolate flavor in the same way salt amplifies chocolate in any application. Maldon sea salt is the classic choice.
Common Mistakes to Avoid
Melting the chocolate on too high heat. High heat can scorch the chocolate or cause the condensed milk to separate. Always use medium-low heat and stir constantly, or microwave in short intervals. Chocolate that’s been overheated turns grainy and dull.
Using melted butter instead of softened butter in the filling. Melted butter makes the peanut butter filling too loose to hold as a distinct layer under the weight of the top chocolate. Softened butter incorporates smoothly without liquefying the filling.
Not letting the chocolate base cool before spreading the peanut butter layer. Hot chocolate poured into the dish and immediately covered with the peanut butter filling can partially melt and mix with the filling at the interface. A 5 to 10 minute rest allows the base to firm slightly so the layers remain distinct.
Cutting before fully chilled. Underchilled fudge is too soft to slice cleanly and the layers can smear into each other. Two hours minimum, overnight preferred.
Skipping the parchment lining. Fudge stuck to an unlined pan requires digging it out in pieces rather than lifting it cleanly. Always line with parchment with overhang.
Variations and Substitutions
Add Reese’s pieces or mini Reese’s cups: Press halved mini Reese’s cups or a handful of Reese’s Pieces candies into the top chocolate layer while it’s still warm. They set into the surface and produce a fudge that announces its inspiration before anyone takes a bite.
Swirled version: Instead of distinct layers, drop spoonfuls of the peanut butter filling over the chocolate base and use a knife or toothpick to swirl the two together before chilling. The swirled version looks dramatic and requires no precision spreading.
Dark chocolate version: Use dark chocolate chips (60 to 70 percent cacao) for a more intense, less sweet chocolate layer that provides stronger contrast with the sweet peanut butter filling. Many people prefer the dark chocolate version for its more adult, balanced flavor profile.
White chocolate base: Replace the chocolate chips with white chocolate chips for a white-and-peanut-butter version. The white chocolate layer is sweeter and more vanilla-forward, producing a different but equally satisfying combination with the peanut butter filling.
Serving Suggestions
Serve at room temperature or slightly chilled — room temperature produces the creamiest, most fudge-like texture, while chilled produces a firmer, more candy-like bite. Both are excellent; it comes down to preference. Arrange on a platter for a dessert spread or pack into a tin for gifting. These travel well wrapped individually in wax paper and make an excellent addition to holiday cookie trays alongside other confections.
Storage
Refrigerator: Store in an airtight container separated by parchment or wax paper layers for up to 2 weeks. The fudge is at its best in the first week.
Room temperature: Stores at room temperature in an airtight container for up to 5 days in cool conditions. Avoid heat and humidity, which can soften the chocolate layer.
Freezer: Freeze individually wrapped pieces in an airtight container for up to 3 months. Thaw in the refrigerator for an hour before serving. Frozen fudge is also excellent eaten slightly frozen — the texture becomes firmer and more like the interior of a frozen Reese’s cup, which has its own devoted following.
Nutritional Information
| Nutrient | Per Piece (approx., based on 30 pieces) |
|---|---|
| Calories | 210 |
| Protein | 4g |
| Carbohydrates | 24g |
| Fat | 12g |
| Saturated Fat | 5g |
| Fiber | 1g |
| Sugar | 20g |
| Sodium | 95mg |
Nutritional values are estimates based on semi-sweet chocolate chips and standard ingredient brands. Values will vary based on dish size and cutting thickness.
FAQ
Can I use natural peanut butter?
It’s not recommended. Natural peanut butter with separated oil produces an unstable filling that can be greasy and inconsistent in texture after chilling. The filling may not firm properly or may separate slightly. Commercial creamy peanut butter (Jif, Skippy, or equivalent) is fully homogenized and produces reliable, smooth, consistent results every time. For this specific application, commercial is the better choice.
How do I get clean layers when slicing?
Three things produce clean layers: chilling overnight (fully firmed layers don’t smear), using a sharp knife (dull knives compress rather than cut), and warming the blade between cuts (hot water run over the blade and wiped dry immediately before each cut prevents the chocolate from cracking and the peanut butter from sticking to the knife). All three together produce textbook cross-sections.
Can I make this without graham cracker crumbs?
Yes, but the filling texture changes. Without graham cracker crumbs, the peanut butter filling is softer, stickier, and less structured. It will still taste excellent but won’t replicate the slightly crumbly, dense Reese’s cup interior texture as closely. Crushed vanilla wafers or crushed Golden Oreo filling-removed cookies are the closest textural substitutes.
Can I use chocolate melting wafers instead of chocolate chips?
Yes. Chocolate melting wafers (candy melts) produce a slightly glossier, snappier chocolate layer that sets firmer than chocolate chips melted with condensed milk. The flavor is less complex than real chocolate, but the texture is very clean and professional. If using melting wafers, reduce the condensed milk to 10 ounces since wafers produce a thinner melt than chips.
How thick should each layer be?
In a 9×13 dish, each chocolate layer is about a quarter inch and the peanut butter layer is about a half inch — producing a fudge that’s roughly an inch total. In a 9×9 dish, all layers are proportionally thicker and each piece is more substantial. The 9×9 produces a fudge that more closely resembles the thick, candy-bar proportions of an actual Reese’s cup. Choose the dish size based on whether you want more pieces (9×13) or thicker pieces (9×9).
Conclusion
Reese’s peanut butter cup fudge is the no-bake dessert that delivers exactly what the name promises — the flavor combination of the most beloved candy in America in a layered fudge format that requires no special equipment, no candy thermometer, and no baking whatsoever. Melt the chocolate, mix the filling, layer, chill, and slice. The result is a confection good enough to bring to any gathering, give as a gift, or simply keep in the refrigerator for the moments that call for something that tastes like pure, unapologetic indulgence.