
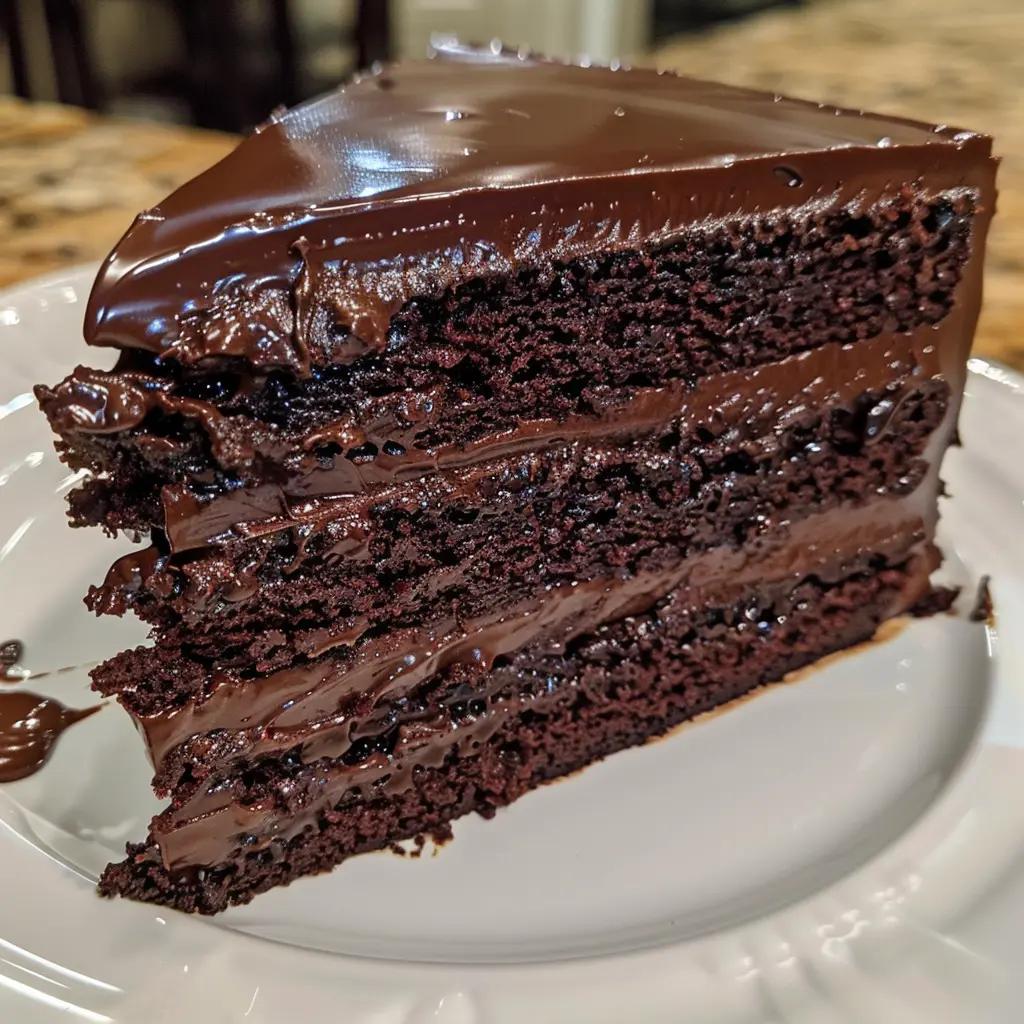
Chocolate fudge cake stacks three deeply chocolatey, moist sponge layers and sandwiches them together with a thick, glossy ganache made from real melted chocolate, double cream, and butter. It’s the kind of cake that looks like it belongs in a bakery window, with a tender crumb on the inside and a rich, fudgy frosting that holds everything together in dramatic layers.
| Detail | Info |
|---|---|
| Prep Time | 25 minutes |
| Cook Time | 25 minutes |
| Chill Time | 1 hour (for ganache) |
| Total Time | About 2 hours |
| Servings | 12 to 14 |
| Difficulty | Medium |
| Cuisine | British / American |
Why This Recipe Works
Combining the dry ingredients in one bowl and the wet ingredients in another before bringing them together is standard cake-building practice, but the order matters here for a specific reason: whisking the milk, oil, eggs, vanilla, and a portion of melted milk chocolate together first creates a smooth, emulsified liquid base. Folding the dry ingredients into that base, rather than the reverse, helps prevent overmixing and keeps the gluten development to a minimum, which is part of what gives this cake its tender, fudgy crumb rather than a tough or rubbery one.
Adding hot water (or hot coffee, as the recipe suggests as an option) to the batter at the very end is a classic chocolate cake technique that does something cocoa powder genuinely needs: it blooms. Cocoa powder’s flavor compounds are more fully released when they come into contact with hot liquid, and stirring hot water directly into the batter intensifies the chocolate flavor throughout the finished cake significantly more than if the liquid were added at room temperature. This is also what keeps chocolate cakes from tasting flat or dusty, a common problem when this step is skipped.
Using both bicarbonate of soda and baking powder together provides a more reliable and balanced rise than either leavening agent alone. Bicarbonate of soda reacts with the acidic components in the batter, including the cocoa powder itself, to produce lift quickly, while baking powder contains its own acid and continues providing lift more gradually throughout baking. Together, they produce a cake that rises evenly without collapsing or developing an overly coarse crumb.
The ganache in this recipe goes beyond a simple melted chocolate and cream mixture by incorporating both milk and dark chocolate together, along with butter and icing sugar after the initial melt. The combination of milk and dark chocolate balances sweetness against depth: milk chocolate alone can taste one-dimensional, while dark chocolate alone can be too bitter for a crowd-pleasing frosting. Stirring in butter once the chocolate and cream have melted together adds extra richness and helps the ganache set into a firmer, more spreadable consistency once chilled, rather than staying loose and runny.
Refrigerating the ganache for at least an hour before using it is what transforms it from a warm, pourable sauce into a thick, spreadable frosting with body. Ganache used straight off the stove is far too loose to hold three cake layers together or to be shaped decoratively. The chilling time allows the cocoa butter in the chocolate to firm back up, giving the ganache the structure it needs to function as a proper filling and coating.
Ingredients
For the Sponge
| Ingredient | Quantity | Notes |
|---|---|---|
| Plain flour | 240g | Standard all-purpose flour |
| Cocoa powder | 30g | Unsweetened cocoa powder, sifted for the smoothest batter |
| Granulated sugar | 400g | Provides sweetness and contributes to a moist crumb |
| Bicarbonate of soda | 2 tsp | Reacts with acidic ingredients for quick lift |
| Baking powder | 1 tsp | Provides additional, more gradual leavening |
| Milk | 240ml | Whole milk for the richest result |
| Vegetable oil | 110g | Keeps the crumb moist and tender |
| Large eggs | 2 | Room temperature blends most smoothly into the batter |
| Vanilla extract | 1 tsp (for sponge) | Use the remaining teaspoon for the ganache |
| Milk chocolate, melted | 50g | Stirred into the wet ingredients for extra chocolate depth |
| Hot water or hot coffee | 150ml | Blooms the cocoa powder and intensifies chocolate flavor |
For the Ganache
| Ingredient | Quantity | Notes |
|---|---|---|
| Double cream | 300ml | Heavy cream; forms the base of the ganache |
| Milk chocolate | 300g | The remaining portion after reserving 50g for the sponge |
| Dark chocolate | 100g | Balances the sweetness of the milk chocolate |
| Vanilla extract | 1 tsp (for ganache) | Stirred in after removing from heat |
| Unsalted butter | 200g | Adds richness and helps the ganache set with body |
| Icing sugar | 150g | Sweetens and thickens the finished ganache |
Step-by-Step Instructions
Phase 1: Mix the Batter
- In a large bowl, combine the plain flour, cocoa powder, granulated sugar, bicarbonate of soda, and baking powder. Whisk together to ensure even distribution and break up any clumps in the cocoa powder.
- In a separate bowl, whisk together the milk, vegetable oil, eggs, 1 teaspoon of vanilla extract, and the 50g of melted milk chocolate until smooth and well combined.
- Fold the dry ingredients into the wet mixture in batches, stirring gently until just combined. Avoid overmixing at this stage.
- Stir in the hot water or hot coffee until the batter is smooth. It will be quite thin — this is normal and expected for this style of chocolate cake.
Phase 2: Bake the Sponges
- Line three 8-inch cake tins with parchment paper. Divide the batter evenly among the three tins.
- Bake at 160°C fan for approximately 25 minutes, or until a toothpick inserted into the center of each cake comes out clean. Baking times can vary slightly between ovens, so begin checking a few minutes before the recommended time.
- Remove the cakes from the oven and allow them to cool in their tins for about 10 minutes before turning them out onto a wire rack to cool completely. The cakes must be fully cooled before assembling, or the ganache will melt and slide.
Phase 3: Make the Ganache
- In a saucepan over low to medium heat, melt together the double cream, 300g of milk chocolate, and 100g of dark chocolate, stirring frequently until completely smooth.
- Remove the saucepan from the heat. Stir in the remaining 1 teaspoon of vanilla extract, the unsalted butter, and the icing sugar. Continue stirring until all the lumps have fully dissolved and the mixture is smooth and glossy.
- Transfer the ganache to a bowl, cover, and refrigerate for at least 1 hour, or until it has thickened to a spreadable consistency.
Phase 4: Assemble the Cake
- Once the cakes are completely cooled and the ganache has chilled and thickened, place the first sponge layer on a serving plate or cake stand. Spread a generous layer of ganache evenly over the top.
- Place the second sponge layer on top and repeat with another layer of ganache. Add the final sponge layer on top.
- Use the remaining ganache to cover the top and sides of the cake, smoothing it with a palette knife or spatula. Decorate however you’d like — chocolate shavings, fresh berries, or a simple dusting of cocoa powder all work beautifully.
Chef Tips for Perfect Results
Use hot coffee instead of water for a deeper chocolate flavor. Coffee doesn’t make the cake taste like coffee; instead, it enhances and deepens the existing chocolate notes, a trick commonly used in chocolate cake recipes for exactly this reason.
Sift the cocoa powder. Cocoa powder is prone to clumping, and sifting it along with the other dry ingredients helps ensure a smooth, lump-free batter.
Don’t skip the full hour of chilling for the ganache. Using the ganache too soon, while it’s still warm and loose, will result in layers sliding apart and a frosting that won’t hold its shape on the sides of the cake.
Level the cake layers if needed. If any of the sponges have domed significantly during baking, trim the tops flat with a serrated knife before assembling for a more even, professional-looking finished cake.
Bring the ganache to room temperature briefly if it becomes too firm. If the ganache chills longer than an hour and becomes too stiff to spread easily, let it sit at room temperature for a few minutes and give it a quick stir before using.
Common Mistakes to Avoid
Assembling the cake before it’s fully cooled. Warm sponge layers will melt the ganache on contact, leading to a sliding, messy result. Patience here matters significantly.
Overmixing the batter. Stirring too vigorously once the dry and wet ingredients are combined can develop excess gluten and result in a denser, tougher cake rather than the tender crumb this recipe is meant to produce.
Using the ganache while still warm. Skipping or shortening the chilling time leaves the ganache too loose to hold the layers together or coat the sides of the cake properly.
Not checking for doneness early enough. Ovens vary, and pulling the cakes out a few minutes too late can dry out the crumb. Start checking with a toothpick a few minutes before the suggested bake time.
Skipping the hot water addition. This step blooms the cocoa and significantly boosts the chocolate flavor throughout the cake; leaving it out results in a noticeably flatter-tasting sponge.
Variations and Substitutions
Add a layer of raspberry jam: A thin layer of raspberry jam between the ganache layers introduces a bright, slightly tart contrast to the rich chocolate.
Espresso powder boost: A teaspoon of instant espresso powder dissolved into the hot water intensifies the chocolate flavor even further, similar to using coffee but with more control over the strength.
White chocolate ganache: For a different flavor profile, white chocolate can replace some or all of the milk and dark chocolate in the ganache, though the sweetness level will need adjusting accordingly.
Two-layer version: If you prefer a simpler presentation, the batter can be divided between two 9-inch tins instead of three 8-inch tins, adjusting the bake time slightly longer to account for the thicker layers.
Serving Suggestions
Serve at room temperature, sliced with a sharp knife wiped clean between cuts for the neatest presentation. A scoop of vanilla ice cream or a dollop of softly whipped cream alongside each slice complements the richness of the ganache.
Storage
Refrigerator: Store covered for up to 5 days. Bring slices to room temperature before serving for the best texture, as the ganache firms up significantly when cold.
Freezer: Individual slices can be frozen, well wrapped, for up to 2 months. Thaw overnight in the refrigerator before serving.
FAQ
Can I make this cake ahead of time?
Yes, the sponges can be baked a day in advance and stored well wrapped at room temperature, with the ganache made and assembled the next day for the freshest finished cake.
Can I use only dark chocolate or only milk chocolate in the ganache?
You can, though the balance will shift. All dark chocolate produces a more intense, slightly bitter ganache, while all milk chocolate produces a sweeter, milder result. The combination used in this recipe is designed to balance both.
Why is my batter so thin?
This is normal for this style of chocolate cake. The addition of hot water creates a thinner batter than many cakes, but it bakes up into a moist, tender sponge.
How do I prevent the ganache from sliding off the cake?
Make sure the cake layers are completely cooled and the ganache has chilled for the full hour before assembling. A crumb coat (a thin first layer of ganache, chilled briefly before the final coat) can also help if you want an extra-smooth finish.
Can I use this ganache for piping decorations?
Once chilled, the ganache can be whipped briefly with a mixer to lighten its texture, making it suitable for piping borders or decorative swirls on top of the cake.
Conclusion
This chocolate fudge cake delivers everything a great layer cake should: a moist, deeply chocolatey crumb and a rich, glossy ganache that holds it all together. With a few key techniques like blooming the cocoa with hot water and properly chilling the ganache, this cake comes together as something genuinely impressive, worth saving for celebrations or simply whenever a serious chocolate craving strikes.